See also: room shapes (pre-defined)
See also: Multiple Wall Selection
See also: Drag & Drop (room)
See also: Control (Ctrl) Key function
See also: Linking Walls
See also: Wall Labels
See also: Zoom function (room design)
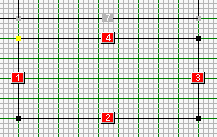
Clicking on the Room Design button  produces the room plan design form. The form displays a scaled graph matrix upon which a room may be drawn free hand when the '+' button on the top menu bar is activated or square/rectangular or 'L' shaped room plans may be designed, using numeric keyboard inputs for each wall, when the corresponding room plan symbol button is activated on the top menu bar.
![]()
Free hand drawing of each wall is achieved by marking (with left Mouse button click) directly on the graph 'nodes' that represent the start and finish locations of each wall. There is no limit to the number of walls that the program can handle. Essential in practice as even simple room plans often have columns and rebates that should be allowed for and every change in wall direction is effectively treated by the program as a separate 'wall'. Each section of wall is identified by a numbered and colored 'wall label' that appears approximately midway between the node points for the identified wall. It is also possible to identify walls upon the same axis where a change in construction material occurs along the length of the wall, by introducing (or including when drawing) additional nodes along the same section of wall. Additional nodes may be introduced within a section of wall by clicking on the '+ nodes' button on the top menu bar and carefully focusing the Mouse cursor over the section of wall where the node is to be introduced.
In order to accommodate a wide range of computer screen sizes and at the same time afford a reasonable amount of accuracy and convenience, the optimum scale for the graph has been selected where one screen pixel represents 5cm (approximately 2"). Where this is not sufficiently accurate then by right Mouse button clicking with the cursor focused upon the wall label the user may enter (or correct) precise wall length dimensions using keyboard numeric input.
Wall nodes may be deleted by activating the Delete Wall button on the top menu bar and then left Mouse button clicking with the cursor focused on the relevant wall node.
The entire room design may be cleared by clicking on the Clear Grid button on the top menu bar. Be warned! There is no 'undo' feature in the program to retrieve cleared room designs. First Save the calculation file if in any doubt.
The current room may be moved by holding down the 'Shift' key, and simultaneously clicking inside the room design. By dragging with the mouse, the room can then be re-positioned on the drawing grid.
Clicking the Adjust Room Orientation button produces a form containing a 'Compass Rose'. Buttons at bottom left and bottom right of the Compass Rose allow 'rotation' of the room to match it to geographic North or any orientation to within 22.5ş of geographic North. Sufficiently accurate for all practical purposes of solar radiation heat gain if combined with a reasonable level of accuracy when drawing the room in the first place. For speed, the Compass Rose may be clicked upon directly at the desired point in order for 'snap to' orientation to be entered.
For complex room plans where many short lengths of wall are involved, for example when accurately depicting columns and rebates, the screen can become congested with wall labels that obscure parts of the design. By clicking on the mutually exclusive buttons for Show Buttons or Hide Buttons then wall labels may be revealed or hidden as desired.
When a wall has been drawn its corresponding red wall label may be clicked upon to produce the Wall Details form. Once construction materials have been selected for a wall then the wall label color changes from red to grey. It is though possible to click on a grey wall label to re-enter the Wall Construction form to edit previously selected materials for any given wall. It is also possible to activate the Select button (symbol of a conventional Mouse Cursor arrow) on the top menu bar and to draw by pointing and holding the left Mouse button, a 'frame' around all or a selection of adjacent walls to change from red or grey wall label color to yellow wall label color. By clicking on any of the yellow wall labels the Wall Details form will be activated and entries there will then simultaneously affect ALL of the walls for which yellow wall labels were currently displayed. A warning message appears on the screen to this effect to help ensure that previously entered complex selections are not inadvertently over written.
No matter how complex the room plan design, the program will automatically and accurately compute the room internal floor plan area. Room internal volume can of course only be computed once the room internal height figure (external by changeable default for Coldwind) has also been entered and this is done on a separate form called the Wall Height form which is outside of the Room Design form.
See also: room shapes (pre-defined)
See also: Multiple Wall Selection
See also: Drag & Drop (room)
See also: Control (Ctrl) Key function
See also: Linking Walls
See also: Wall Labels
See also: Zoom function (room design)